Set up a virtual Windows Server 2016 for Homelab: Part 0: Introduction: Set up a Server Name and IP Address
Virtual Homelabs are arguably one of the best ways to get IT applicable skills before applying for that dream tech job. Or so all of my friends working tech jobs have told me. And following in their footsteps, I will be documenting my journey setting up my first Active Directory on a Windows Server along with Windows 7,8, 10 workstations as clients. For reference, I just passed my CompTIA A+ certification exam about a week ago and thought I should put my newly developed skills to use and solidify my skills will I begin my job search for a Tier 1 Helpdesk position.
In this nine-part series I will walk you through setting up a Windows Active Directory on a Windows Server 2016 virtual machine step by step;. I will discuss problems that may come up that are not immediately obvious to those new to tech. And mostly, to be honest, I'm making this blog to document my progress and as a refresher course for myself should I ever forget how to set things up to my standards. Now then, let's get started.
Pre-requisites, seeing as we're going to have 4 virtual machines running simultaneously, plus perhaps, a few more running Linux clients and maybe a Firewall, and IPS (Intrusion Prevention System), we're going to need some more highly-powered computer components. I'll go ahead and list the relevant parts in this posts right below. However, if you're interested in a more in-depth look at my rig, you can visit my previous post on my build here.
CPU: i7-4790K CPU @ 4.00GHz
RAM: 32GB (4 x 8GB) DDR3 DRAM 1600MHz
Storage:
OS Storage: Suneast SSD Se800 256 GB 2.5 in SSD
Video Editing Storage: King Spec 1TB 2.5 in SSD
Video Archiving Storage: 2 x 8TB Seagate Baracuda ST8000DM004-2CX188 HDDs in Raid 1
If you have a the funds, I highly suggest maximum RAM and a high capacity SSD. You WILL be rebooting your workstations very frequently and a fast SSD will make things much easier, and frankly make troubleshooting an almost enjoyable process....I kid.
If you can't afford the hundreds of dollars for the 32 GB of ram and 1TB SSD, You should be fine with these specs
CPU: quad core
RAM: 16 GB
SSD: 250 GB
There's also free VM providers (at least for a month) online. Look into the Azure VM environment if you are having trouble with funding right now.
Once you have your system requirements upgraded you can start installing your VMs on your hypervisor. I personally prefer Hyper-V on Windows. But feel free to use any other hypervisor. Microsoft has easy to follow instructions on setting up Virtual machines here.


Note the first IP address you've input as this will be the DNS server your workstations will refer to when getting on line once you have them join the domain you've set up.
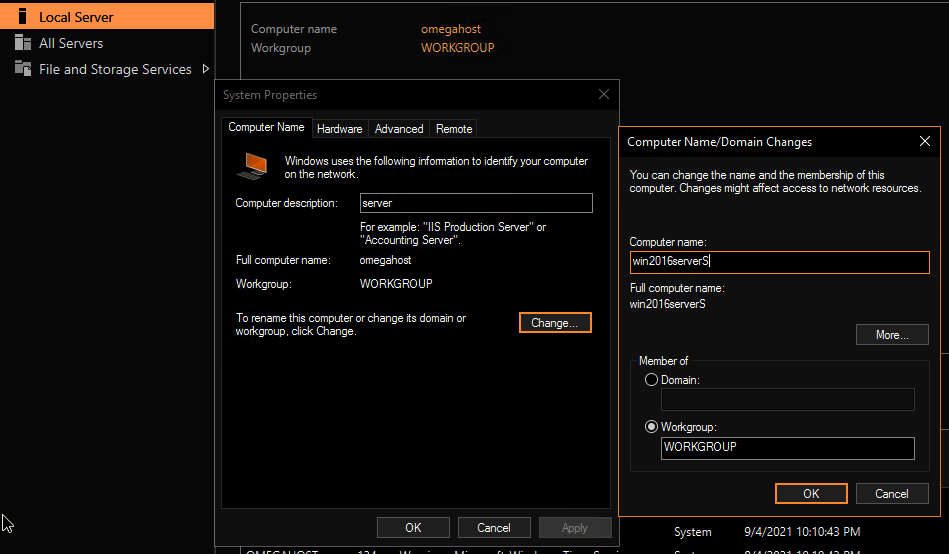
Now that we've successfully installed the operating systems into our hypervisor it's time to rename our server to something more memorable as well as to change the IP Address from Dynamic to Static because we don't want our IP address information changing and then the server becoming unreachable to the clients.
Change server name
Server Manager > Local Server > Computer Name > Change > OK > Restart later
Change IP address from Dynamic to Static
Windows Key + R > cmd > ipconfig > write down Ipv4 address, subnet mask, and default gateway
Server Manger > Local Server > Ethernet > Right Click Ethernet Port > Properties > [select] Internet Protocol Version 4 > Properties > Use the following IP address > Enter credentials from Ipconfig and router gui on your browser > OK
*if your router doesn't provide Preferred and Alternate DNS server information you can simply but 127.0.0.1 inthe Preferred DNS server IP address input box.
That's it for now.
In part two of this series we will look at how to Install roles and features in preparation for upgrading the server to the Domain Controller.
Comments
Post a Comment